Finally, a Road Trip!

Not mentioned in my Bio, I played bassoon. Okay, now I feel better after that confession. A while back I decided to pick it up again, so I made some reeds (I still know how) and gave it a try. It took a while for everything to come together, sort of, and I knew it was well past time to have the instrument serviced. A colleague told me of a repairman in Pasadena who does wonderful work, so I contacted him and arranged for a time to drive down and leave it for him to repair. Then I heard there was going to be a group of photographers who were gathering in Southern Utah to photograph Snow Canyon State Park, Zion, and Bryce Canyon National Parks. The time frame was perfect. I could drive to Pasadena, drop off the bassoon, do the Utah Workshop, drive back to Pasadena, pick up the bassoon, and drive back home.

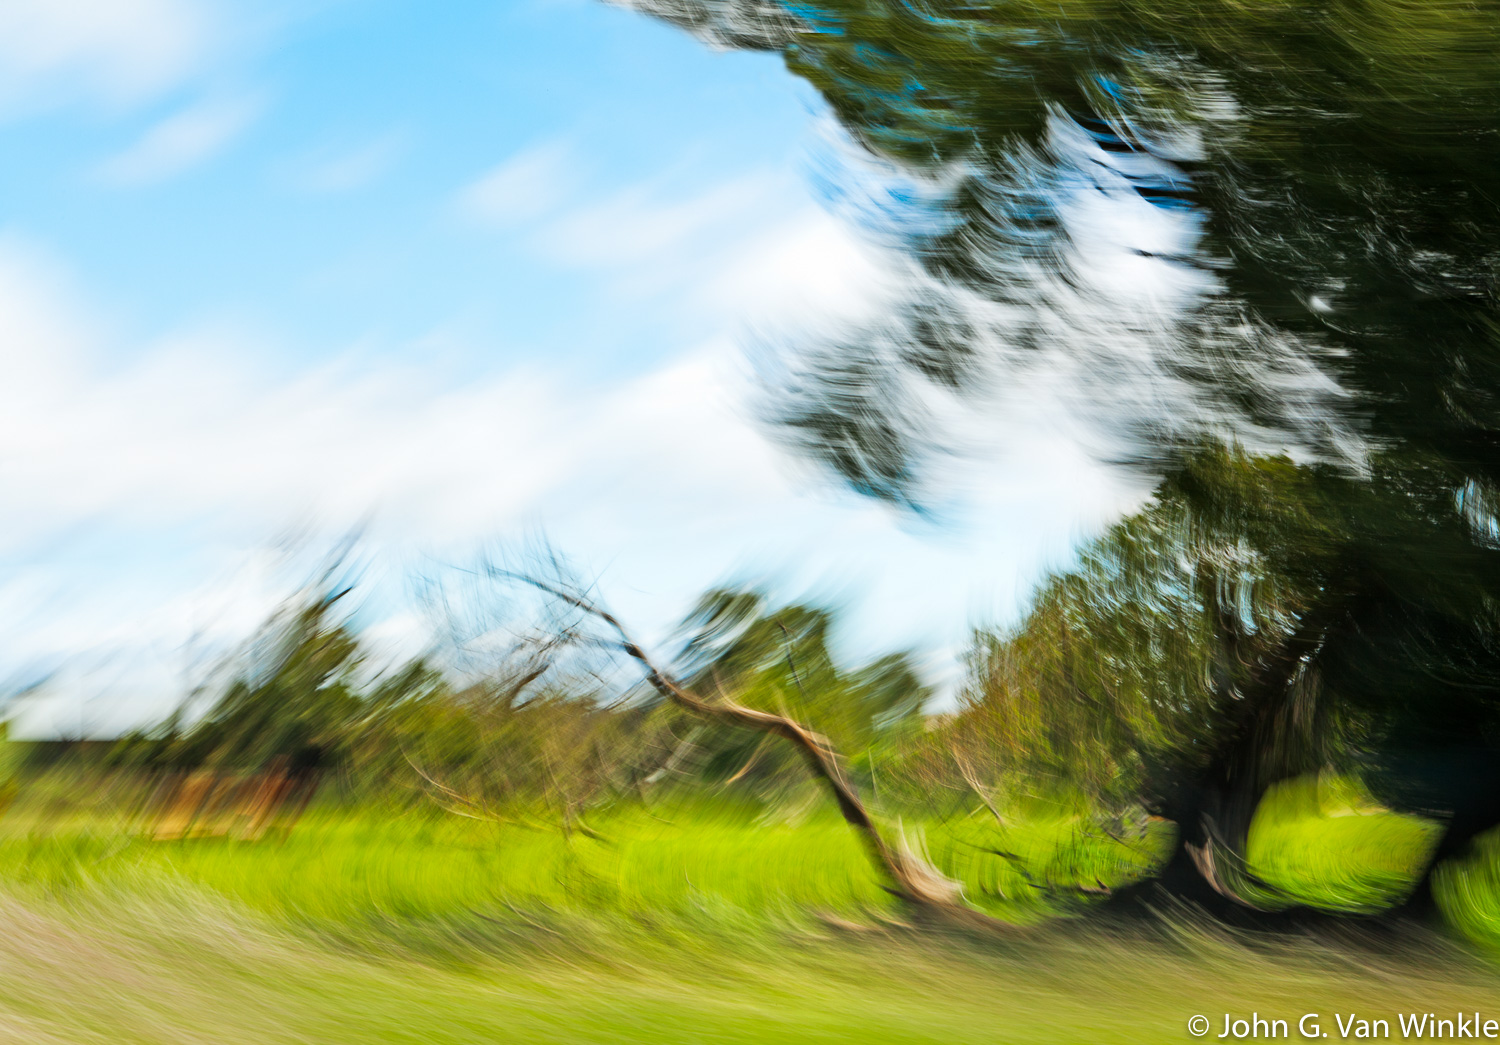
So, here’s how it went. I drove from the Bay Area to Pasadena and dropped off the bassoon. I stayed that night after having a fine dinner at the historic Denny’s restaurant on the Old Route 66 which is one of several establishments in the area that exemplifies the Googie style of architecture.

Googie style of architecture in Pasadena, CA

The next day I drove to Barstow and found there was an area called Rainbow Basin, just a few miles north of town. The map shows that the route makes a loop from Barstow to the basin and back around to Barstow. On the way to the basin, driving through the desert, I was surprised to see a boat, moored in the sand. I had to turn around and photograph that as it seemed so out of context. There was no water for miles around!

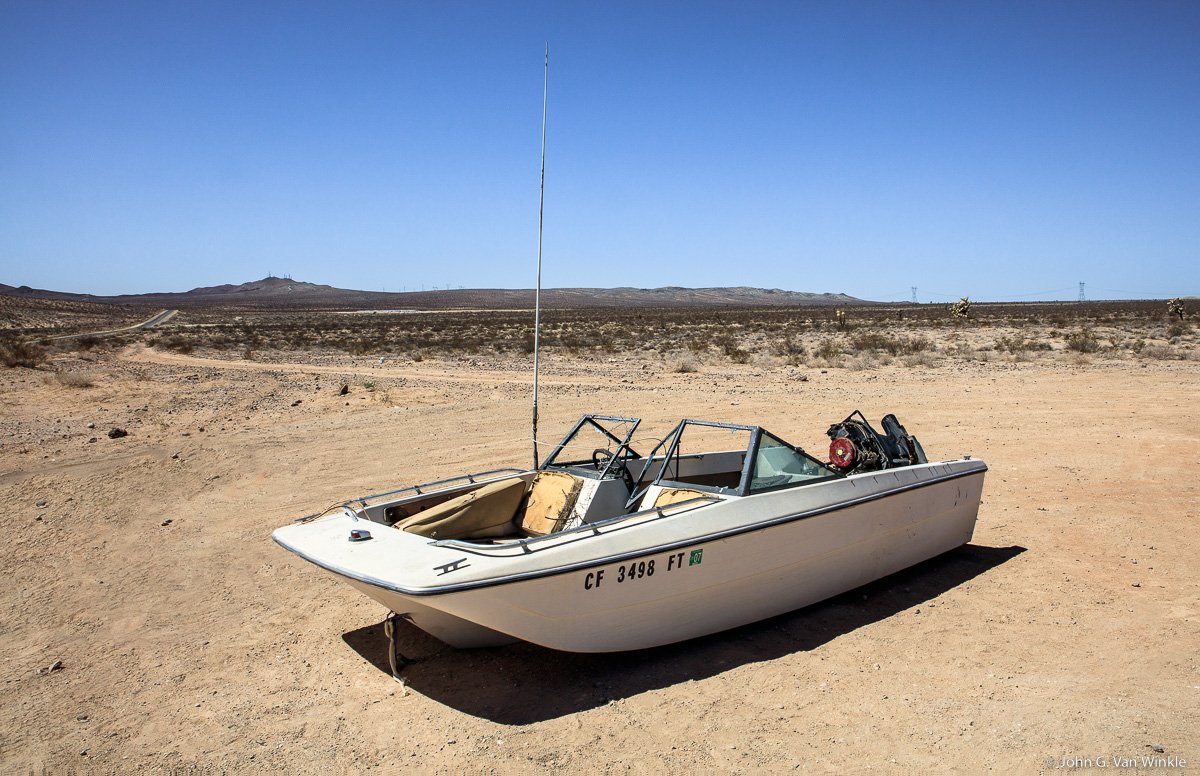
Waiting for a flood?

After turning left off the main road, I was driving on a dusty, hard-pan road where I eventually turned right onto an even dustier road which then forked to a one-way road that loops through the basin. It was late afternoon when I reached the basin, so I stopped briefly in several locations to photograph various geologic features. I even found a couple of ‟faces” to add to my collection of Faces of Nature, and a Few Others.

Cracked “Face”

How many “faces” do you see?

At one time this part of the Mojave Desert was a lush marsh and there are many fossils embedded in the stratified layers of the uplifted walls. Besides fossil insects, there are leaves, camels, small horses, smilodons, and mastodons. Not much lives in the basin these days. Vegetation is low lying and sparse, and Joshua trees dot the landscape. There are the usual rattlesnakes, desert rodents, and bugs.

The road narrows as the walls on either side form a canyon. At one point, I stopped to see if my car would fit through a narrow passage with large loose rocks as the roadbed. It looked barely passable, so I gave it a try. It was a tight, bumpy squeeze, but the car got through it unscathed. I could see that once past the narrow portion the road widened so I proceeded up and out of the canyon.

At the top of a knoll, since I was the only one for miles around, I stopped in the middle of the road, such as it was, to photograph the colorful layers of the walls that rise above the basin.

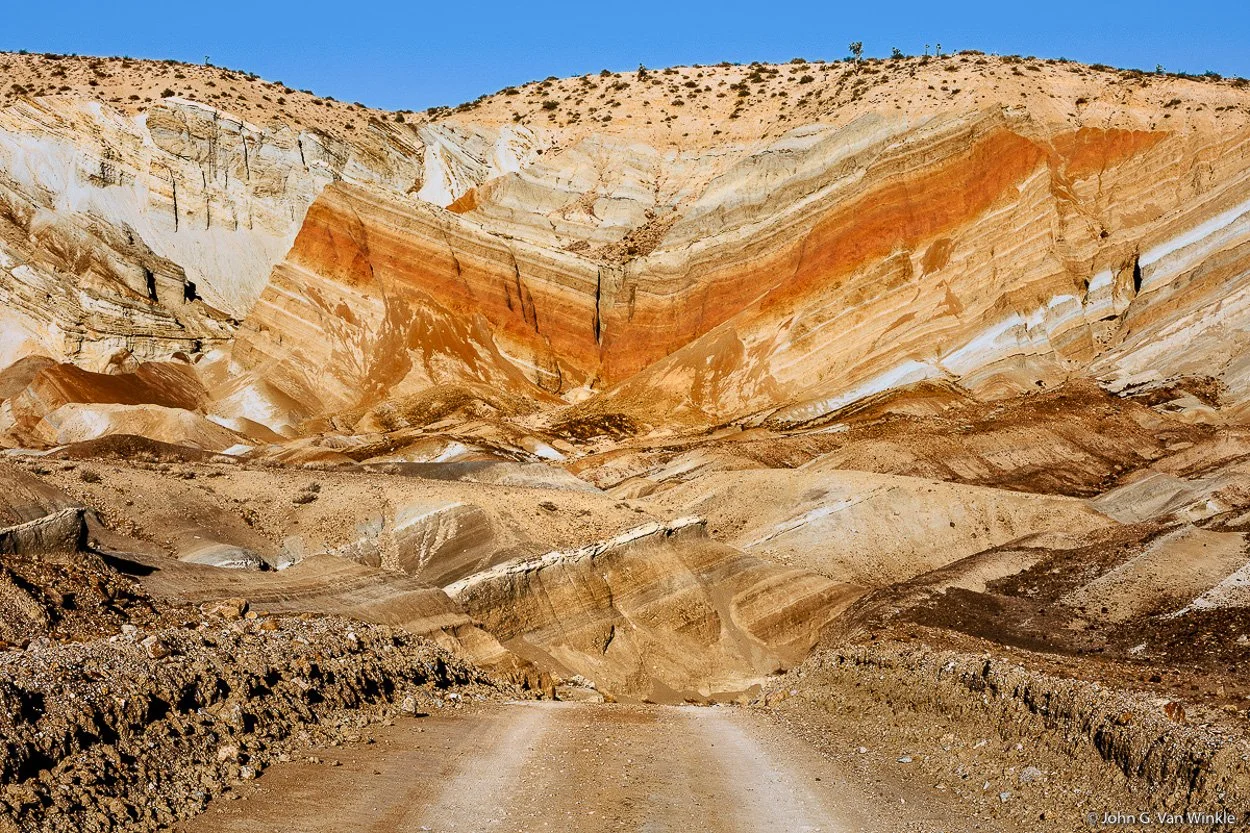
The road from Rainbow Basin

It was nearing sunset as I was leaving the basin, so I stopped to take one last shot of the sun setting through the limbs of a Joshua Tree.

Mojave Desert Sunset

Arriving back in Barstow, I had a wonderful Mexican dinner in the restaurant that was connected to the motel where I spent the night.

The next morning, I drove straight through Las Vegas and on to St. George, Utah. Highway 15 goes through the northeast corner of Arizona where the landscape changes dramatically from relatively flat high desert to the high, narrow, Virgin River Gorge which is quite spectacular. One can have a sense of feeling claustrophobic after experiencing the expansive views in the Nevada desert.

Arriving in St. George, I had some time, so I drove around to check out the geology and to acquaint myself with the area that I was going to be photographing the next day. My initial impression of the area was ORANGE. Lots and lots of ORANGE. The cliffs, sound walls around private communities, retaining walls, walls of buildings…ORANGE! The color is due to quartzite sand that once covered the area, indeed most of Utah. The sand formed dunes that were later buried, hardened into stone, and subsequently eroded by wind and water that carved the canyon. On top of the formations, you see dark patches of lava that were deposited at different times, from about 1.4 million to 27,000 years ago.

I stopped several times to photograph different rock formations that had been weathered in interesting ways. Quite often people were climbing either up the side or finding their way to the top of less steep formations.

Climbing the rocks around St. George, Utah

The weather was very pleasant as evening approached. Indeed, it was pleasant the whole trip which started 1 April and went through 10 April.

The workshop group, led by Joe Brady, gathered at 3:00 PM the next afternoon.  Joe had led groups in the area before, so he knew routes, best times of day to photograph specific formations, restaurants, and most importantly where to get a good cup of coffee.  His workshops are about getting the composition right and we talked about how to post-process our images.  This was done with no pressure.  He would guide us to an area, make a few suggestions, and let us loose to photograph.  Occasionally he would look at what we were seeing through our cameras and would make suggestions as to what we might do to make a better image. 

After introductions in the motel lobby, we headed to Snow Canyon State Park and photographed various features while climbing to the top of one of the petrified sand dunes.  There were interesting patterns in the dune, and an occasional low juniper tree that had established a foothold in the rock.  Scattered around the dune we found lots of Moqui marbles that ranged in size from approximately 2 inch (5.08 cm) in diameter to smaller that a pea.  Moqui marbles are iron concretions that have eroded away from the cross beds of Navajo Sandstone found in this and in other areas in southern Utah.    

Moqui Marbles and Weathered Tree, Snow Canyon, Utah

After gathering for dinner and downloading the day’s files, it was off to bed, with an early rise to again photograph Snow Canyon, then travel on to Zion National Park.  We reached Zion around noon.  The plan was to meet at the Visitor Center and take the shuttle (private vehicles were not allowed at that time of year) to the Temple of Sinawave, the last stop.  I cruised the parking lot at the Visitor Center for almost an hour and finally found a parking place, made it to the shuttle, and eventually the meeting place.  We photographed our way up the Riverside Walk to where the narrows begin but did not cross the river to wade on up to the narrows.  That may be for another time, when arriving earlier in the day would afford an extended excursion up the river and be able to make it back to catch the last shuttle.  We were warned by the driver, several times, to be sure to make it back to catch the last shuttle at 7:00 PM or we would have an eight-mile hike back to the Visitor Center.

We stayed in a motel outside of Zion National Park and the next morning headed to Bryce Canyon which included a stop to climb to the top of the Canyon Overlook Trail. This is a rather steep, and at times very narrow climb along a trail that had just a few railings along areas of the sheerest drop-offs. There were a couple of places what were wet which had me leaning into the side of the cliff and looking for hand holds. The climb was well worth the effort. The trail ended at a steep drop-off and a panoramic view of the canyon below.

View from the Top of the Canyon Overlook Trail

After lunch, and pie, and checking in to another motel, we headed to Bryce Canyon with a stop at Red Canyon to photograph the hoodoos. This area is often ignored by tourists eager to get to Bryce Canyon. It’s also a good area to find several naturally occurring ‟faces” to photograph.

Hoodoos, Red Canyon, Utah

The road approaching Bryce Canyon doesn’t reveal the view of the canyon or the thrill of seeing it for the first time, but a short walk to the canyon edge left me speechless seeing the grand view below.  I stood there in awe, wondering how in the world I was going to photograph what I was feeling while looking down at so many years of geologic history.  We photographed the canyon at sunset from Sunrise Point because all the other photographers were congregated at Sunset Point.  The next morning, we got up early and drove back the park to photograph the sunrise at Sunset Point…Same reason.  The rest of the day at Bryce was spent at various stops in the park, each one just as exciting as the last.  

Our last night was in Springdale. That evening I got a text from the person overhauling my bassoon, saying that it would not be ready for pick-up on my return to Pasadena, so I said something like ‟The best laid plans…” and cancelled my motel reservation in Pasadena.

The final day of the workshop was another stop at Snow Canyon. This time we climbed into and above the Whiterocks Amphitheater to get shots of white Navajo Sandstone that is another grouping of petrified sand dunes in the north part of the park.

Joe Brady standing in the Whiterocks Amphitheater shows the scale of the petrified sand dunes.

After dinner in St. George, some of the group returned to the park for sunset shots.  We didn’t have a grand sunset, but there were a few clouds that picked up some color for a few minutes, and then there was nothing.

Sunset over the lava-capped petrified sand dunes. Snow Canyon State Park, Utah.

Early the next morning I headed back to Barstow. This time, I took a side trip to take some pictures of an old train depot in Kelso, California, at the request of my son-in-law who likes all things trains. Kelso is entered in a rather substantial list of California ghost towns and was most active during short lived mining operations for borax, iron, gold, and silver in the 1940’s. The depot, which is now a visitor’s center, and under renovation, opened in 1905, had a hotel and restaurant available for passengers and employees. The depot ceased operation in 1964 and the restaurant closed in 1985. The Depot Visitor Center is supposed to reopen in the Spring of 2023.

Kelso Train Station

When I got to the restaurant in Barstow, it was packed. I found out that it was reserved for the hundredth birthday celebration of a local lady, and I had just missed hearing the Mariachi band that was hired for the event. I would liked to have heard the band play. Back in the room, I took some time to download my files from Kelso, rested a bit, and was able to have dinner once the crowd thinned out.

Heading for home the next morning, I set the cruise control to the speed limit, moved over to the right lane so everyone could pass me, and made my way back to the Bay Area.

But wait! I just heard that my bassoon will be ready in sometime July, so I am looking forward to another road trip!!

Most recently added gallery to my website: Water-Monochrome


Wave Action, Pebble Beach, California

Wave Action, Pebble Beach, California

Subjects of water can exhibit both power and calm. They provide endless photographic possibilities.  While photographing running water, each exposure of the same subject is different in composition and texture.  I will use different apertures and time exposures to give myself choices to work toward the expressive final image.  When photographing rivers, waterfalls, or waves at the beaches, I expose multiple images each time I set up my equipment then choose what I consider the best of the lot after viewing the darkroom proof sheets or post processing digital files.  It’s rather hard to stop and think I’ve got the "best" image, especially when I observe an even better one as I am packing up my gear.  I guess there is always a better image waiting for me tomorrow, next week, next month, whenever.  That’s what keeps me photographing.
 
Photographing still water (for example, I want to make an image of a lake, there is a clear sky, the camera is on a sturdy tripod, the mirror is locked up, I am using a cable release, and there is absolutely no wind) can engender a feeling of mood, depending on what I want to express in the final image.  Light and airy, dark and moody, natural color, high contrast, soft focus, high dynamic range, and monochrome are some of the choices that are available to create mood in an image of water that is static.   

While driving along the coast, I occasionally stop to view patterns on the sand created by the waves.  I use a short shutter speed to stop the action of the water as each crashing wave reveals a different pattern in the foam as it runs up the sloping beach front. That forward motion of the foam is called swash and as it runs back down it’s called backswash.

The choice of aperture/shutter speed when photographing water depends on what I want to exhibit in the final print, whether it be a lot of movement, some movement, or the texture of the water as it is stopped with a very short exposure.  

Images in the new gallery are scanned 2 1/4 x 2 3/4 inch and 5 x 7 inch negatives, as well as digital format images.  I hope you enjoy this new gallery.


New Images and a Day Trip

I’ve just added several images to the following galleries:  Just Color, Trees-Monochrome, Europe-Monochrome, Abstracts, Yosemite-Color, and Yosemite-Monochrome.  Please visit these galleries.  Also, over the past few months I have added images to my other galleries so I hope you will visit and enjoy those as well.  

In January I drove up to Yosemite for a day of photography.  On the way I was treated to a spectacular sunrise.  Unfortunately, it lit up shortly after leaving Oakdale in the area where there is no safe place to pull over, find a foreground, set up and photograph the colorful scene.  The colors only lasted a short four or five minutes before the clouds started to fade from bright colors of red, orange, and purple hues into a dull uninteresting grey.     

Icicles at Crane Flat, Yosemite National Park, California

Icicles at Crane Flat, Yosemite National Park, California

After reaching the Yosemite boundary and putting on chains I drove to Crane Flat and spent the rest of the morning photographing around the area where the Tioga Road is closed for the winter.  The snow from previous storms measured around five feet.  The weather was clear and cold when I started to photograph.  As the sun hit the trees the snow blanketing the limbs and needles started to melt and form icicles.  The icicles were nicely backlit by the sun. With just the blue in the sky and minimal green in the trees, I knew that I wanted to make the final image a monochrome image.

Bowing to the Others, Crane Flat, Yosemite National Park, California

Bowing to the Others, Crane Flat, Yosemite National Park, California

After photographing snow laden trees and an area where long shadows offered some lovely textures, I drove down to the Yosemite Valley and spent the rest of the day photographing around Bridalveil Falls, the creek below it, and my favorite meadow below El Capitan.  Atmospheric conditions didn’t produce a sunset, but it was a long trip home which included two detours due to road construction and a big rig accident that snarled traffic for miles. 

Two New Galleries

Watch that First Step!

Watch that First Step!

Fly Curtain and Colorful Shadows

Fly Curtain and Colorful Shadows

If you haven’t visited my galleries for a while, I’ve added several new images to just about all of them.  If you have been visiting regularly, I have just added two new galleries to the website.  One is titled "Just Monochrome" and the other is titled "Just Color".  The images in both galleries don’t really fit into a specific category, rather they are images that I like and wish to share.  I will continue to add images to these galleries as well as the others, so please visit as often as you like.  You are welcome to leave comments in my blog section or contact me by e-mail through the Contact page. Enjoy.

More on Scanning Favorite Negatives

OK, I know I haven’t added a blog for a while.  The reason for the hiatus, as mentioned in last May’s blog, is that I now have a new scanner.  It is an Epson Perfection V850 Pro™️ scanner which is giving me a chance to revisit negatives that I have printed in the darkroom and some that were put aside because of time, defects in a negative which precluded spending the time to print them, or for whatever reason.  See examples 1 and 2 below.  The final image, Cloud Over Mono Basin, California, can be seen in the Highway 395 and Death Valley-Monochrome gallery.

Ex. 1: The top left corner and bottom right corner have some deep scratches in the negative that print black in the print.

Ex. 1: The top left corner and bottom right corner have some deep scratches in the negative that print black in the print.

Above is a portion of a photograph that had scratches in the sky that were serious enough in the darkroom print that they couldn’t be removed using potassium ferricyanide while the print was wet and then spot toned to match the surrounding sky after the print had dried.  Many attempts didn’t produce really satisfactory results in a large print.

Ex. 2: This is the same portion of the print after the scratches were removed using Photoshop's spot healing brush tool.

Ex. 2: This is the same portion of the print after the scratches were removed using Photoshop's spot healing brush tool.

The learning curve for the scanner is not so steep, but like any new instrument, once the basics have been learned, one must practice, practice, practice.  The pre-scan converts the negative into a positive image.  Using the pre-scan options, I can adjust the whites, blacks, mid-tones, and contrast to get results that are quite close to what I originally saw when I exposed the negative.  After the final scan I can then use the options available in Lightroom, Photoshop, ON1, or Nik Silver image editing software to make further refinements.  

Looking through proof sheets from 35 mm, medium format, and large format negatives, I am finding images that I now want to scan, edit, and print digitally.  Some I have printed in the darkroom before and some are new.  I kept the printing instructions that were made while making silver gelatin prints, and that gets me started with what dodging, burning, dynamic range, toning, and sharpening I want in the final print.  

One thing remains the same from the wet darkroom process through the digital imaging process…proof prints.  I will talk a little bit about this very important step in my next blog.  In the meantime, please visit my monochrome galleries where I have added images from my negative files.

Road Trip Through Montana and Idaho

At the end of May I took a trip with my family through Montana and Idaho.  Glacier National Park and Craters of the Moon National Monument were areas that engendered wonderful photographic opportunities.  The weather was cool, warm, cloudy, rainy, and delightful in all respects during the short eight day road trip.  I came back with lots of images and now have an idea of where to return and explore in more detail.

I have added MONTANA/IDAHO-COLOR and MONTANA/IDAHO-MONOCHROME galleries, so please check them out.  I have also added two images from the trip to the ABSTRACTS gallery ("Two Cabins, Montana" and "Corn Lily Abstract").

I saw birds, horses with colts, a huge moose that lumbered through a campground, and a bear (fortunately, not a grizzly).

Photographing at the summit of a cinder cone in Craters of the Moon National Monument. Photograph by Linda Lucas

Photographing at the summit of a cinder cone in Craters of the Moon National Monument. Photograph by Linda Lucas

While at the Craters of the Moon, my daughter and I climbed a cinder cone to get a 360° view of the area.  We were surprised to see so many plants and trees growing in the desolate, crumbled pumice-like material on top of the cinder cone as there was no evidence of vegetation on its flanks.  A couple of trees had died and toppled over, and it was there that I observed another subject to add to my FACES OF NATURE (AND A FEW OTHERS)-COLOR gallery.  My daughter caught me photographing the image I call "Evil Looking Face".

Revisiting Favorite Negatives

It’s been a busy month and a half.  I've added two new galleries, THE JAZZ CLUB and FACES OF NATURE (AND A FEW OTHERS)-MONOCHROME to the website and images within other galleries.  Please check them out.   I've been doing a lot of post processing of digital files, scanning old negatives, and printing.  I always make a final print before adding something to my website.  Holding the final photograph in my hands is a satisfying last step in a long and enjoyable journey, from something that I saw to something that is a physical representation of that seeing.

Two Callas

Two Callas

There has been lots of yard work this spring after much needed rain.  I won’t complain about the yard work as it gives me a chance to observe and plan possible subjects to photograph in the garden, some of which are in my galleries.  The photograph to the right is also an example. 

After many years working in the darkroom, I now have a substantial number of negatives that I want to scan, edit (burn, dodge, spot, tone, etc.), and print.  (I have the printing instructions that I made when working in the darkroom and can refer to them as needed.)

I recently scanned and printed an image made with my 8x10 view camera and added it to the YOSEMITE NATIONAL PARK-MONOCHROME Gallery.  It is the one titled Blue Heron on Ice, Merced River.  It brought back memories of how the image was made.  I have a number of images taken along the Merced River and hoped to add another one. I saw the scene below and liked the patterns of the ice and the contrast.

Ice, Merced River, Yosemite National Park, California

Ice, Merced River, Yosemite National Park, California

I set up the camera, focused, metered various places in the scene, and made one exposure.  I knew I had what I wanted, so I replaced the lens cap, took the camera off the tripod, and put it down on my back pack that was resting on the snow.  Just then, behind me, I heard "braaak, braaaaaak".  I knew what it was as I had heard it before, but a lot further downstream.  I turned around and saw a Blue Heron standing in the right place on the ice that I had just photographed.  Realizing that I had not racked in the bellows or changed any of the movements or lens setting, I slowly replaced the camera on the tripod, took off the lens cap, turned the film holder around, and cocked the shutter.  I was ready.  But wait!  The heron was looking directly at me which meant that its beak would not be seen in the image.  At that distance the bird would look like it just had a long neck with no head.  I waited, hoping it would turn its head to the left or right.  After a minute or so It finally looked to its left and I made the exposure.  I had hoped to get another film holder in place in time to make a second exposure, but that was asking too much.  My friend got cold feet and flew off.


Two and a Half Weeks in New Zealand is NOT Enough!

We spent ten wonderful days in the Mt. Wellington area of Auckland, then flew to Queenstown on the South Island. During the next two days I drove, mostly on the left, to Manapouri which we found to be delightfully quiet and beautiful. Early the next morning was gray and windy when we arrived at the dock to take the tour of Doubtful Sound. During the tour the clouds never broke, which made for dramatic skies above the Fiordlands. Saw my first Albatross gliding along on the winds with no need to flap its wings to stay aloft. That evening we drove back to Queenstown and the next morning and afternoon took another boat across Lake Wakatipu. The weather had changed, and we had a clear blue sky.

After another early rise we flew back to Auckland, rented another car and drove to Rotorua to take in the sulfurous air and observe some of the Māori culture for a couple of days. Another drive back to Auckland for an overnight and late-night plane back home the next day. Fortunately, there was a layover of a few hours in Hawaii which gave my legs a chance to unravel and stretch a bit. Altogether, we met some wonderful people, saw and photographed some wonderful sights, and ate too much good food.


Two New Zealand galleries have been added of that spectacular land. Please go over to the Galleries for the color and monochrome selections from the trip.

Here I am taking a short break from a very windy, sometimes misty, sometimes rainy, deck on the boat at Doubtful Sound, New Zealand. Photo by Patricia Van Winkle.

Here I am taking a short break from a very windy, sometimes misty, sometimes rainy, deck on the boat at Doubtful Sound, New Zealand. Photo by Patricia Van Winkle.

Photographing at Lake Manapouri, New Zealand. Photo by Barbara Van Winkle

Photographing at Lake Manapouri, New Zealand. Photo by Barbara Van Winkle

Bee on Iris, Golden Gate Park, CA

Bee on Iris, Golden Gate Park, California

What luck! A bee just arrived on the flower I am about to photograph. Even better luck, the bee landed just in the right place. I see it is just standing on the flower as if trying to decide what to do next. Everything is perfect as I release the shutter, capturing a wonderful macro scene...then I wake up from my nap.

My approach to photographing a flower is to first find one that interests me. Then I look for the angle from which I want to photograph it. I consider the lighting, what to include in the background (if anything), depth of field, length of exposure, how I might need to edit the file before making a print, and what media would best express the feeling of what I saw and felt at the time of exposure. All, or most, of these elements need to be considered quickly. How does that happen? Practice!    

As I usually use a tripod and cable release with the camera, I set these up and compose the subject. Most of the time I use a small aperture for greater depth of field and a low ISO for smoother (less noisy) files. That makes for some long exposures. Here's where the fun begins. I wait, and wait, and wait, until the flower stops moving. Concentrating on the movement I observe the flower from the camera position, not by standing back. Any movement of the flower will cause a fuzzy final image. Even on "calm" days, flowers can move...a lot (you can feel the slightest movement of air if you pay attention). If I think the flower has stopped moving, I'll wait another second, but waiting can also mean another small puff of breeze will start the flower moving again.

Having a bee land on the flower can create more movement. Now you have the bee running around on the petals and the breeze blowing back and forth. Stay with it, don't give up. There is a real sense of satisfaction when everything comes together, and you know you have it right in the camera.

Burned Log

Burned Log, El Capitan Meadow, Yosemite National Park, California

This photograph is from my series of Faces of Nature (and a Few Others). There is actually a clinical name for observing these "faces". It is called Pareidolia. The World English Dictionary says it is "the imagined perception of a pattern or meaning where it does not actually exist". Seeing faces in clouds, on the moon, on a piece of French toast, or a burl on a tree are examples of this phenomenon. I don't go out specifically looking for "faces". If I did, I would probably miss them entirely. They are found, more or less, accidentally. It's always fun when I recognize one. It's also fun to bring them out in the photograph using regular exposure and darkroom procedures as well as digital editing programs. So, what does all this mean? For me, at least, it means that when you are out and about and you get the feeling that something is watching you, well then, something probably is!   

One of my favorite places to photograph is around El Capitan Meadow in Yosemite National Park. A few years ago, there was a controlled burn in and around the meadow. I have visited the park several times after the burn and have observed the regeneration of trees and grasses. There is still evidence of trees that had burned. I had walked pass the log pictured above and turned around to take a look up at the face of El Capitan. As I looked back down, I noticed it resembled a face of some kind and thought it would be a good addition to my Faces of Nature collection. I enjoy hearing what people see in this photograph.


Bristlecone Pine, White Mountains, CA

Bristlecone Pine, White Mountains, California

High in the White Mountains of California on the eastern side of the Sierra you will find the Bristlecone Pine trees. Some are over 4000 years old and one was found to be 4,950 years old. That would be before the pyrimids were being built. These trees live in sparse groves ranging in elevation of 9,000 to over 11,000 feet (2743 to over 3352 meters) above sea level. They grow in dolomite and alkaline layers where not much else can grow so they are not that susceptible to disease or insect infestations. You can find out more about these fascinating trees on the internet if you are interested.


Bark Design on Bristlecone Pine, White Mountains, California


Moving slowly and breathing hard at that elevation gave me the chance to observe these fascinating trees up close. Their gnarled, dry dense bark offers wonderful colors and textures to photograph. As I set up to photograph the side of one of the trees, I envisioned the subject as a vertical format. I wasn't satisfied with what I was seeing through the lens, so I stepped back and studied the scene again. That is when I saw what appeared to be, at least to me, the head of a horse that would be looking to the right with the wind blowing its mane. So, I photographed it vertically, turned it 90 degrees in post processing, printed it horizontally and added it to my "Faces of Nature" collection.